Attachments for Fixed and Removable Dentures
Crown & bridge semi-precision/extracoronal attachments
Semi-precision partial dentures are retained in the mouth by means of mechanical interlocking components. A specially shaped extension of the partial denture fits into or onto a complementary receiving area or projection of a natural tooth that has been crowned. The components fit snugly and consist of a semirigid metal to other surface interface, which may also be metal or some other resilient material such as nylon.
Extracoronal precision attachments
Extracoronal precision attachments are normally resilient to allow free movement of the prosthesis to distribute potentially destructive forces or loads away from the abutments to supportive bone and tissue. Three distinctive movements are defined in function: hinge, vertical, and rotational. The fewer abutments remaining, and the weaker the abutments are, the greater the need for resiliency or free movement to direct the forces away from the abutments to the supportive bone and tissue via the base of the prosthesis.
Advantages of semi-precision/extracoronal partial dentures include:
- A cosmetically enhanced cast partial denture as compared to conventional cast partial dentures that utilize cast clasps
- Blends in with the conformity of remaining natural teeth
- Functions with a more even pressure on remaining natural teeth than conventional partial dentures
- Less tooth reduction is required for the crown than with an intracoronal attachment. Also, the crown can be made an ideal width since it does not have to accommodate an intracoronal attachment.
- Extracoronal precision attachments are typically easier to insert and remove. These are ideal for patients with limited manual dexterity, or if the prosthesis has a difficult path of insertion and removal.
- Intracoronal females in retaining crowns will collect food and present problems when the patient attempts to seat the intracoronal retained prosthesis. Extracoronal attachments do not present this problem.
Non-resilient and Resilient attachments
The choice in partial denture attachments is between Non-resilient and Resilient. Non-resilient (rigid) attachments are highly stable connectors with very slight movement in function such as dovetail and key/key way attachments. Some rigid attachments may be used for segmenting fixed bridges to simplify future case conversion to a removable restoration.
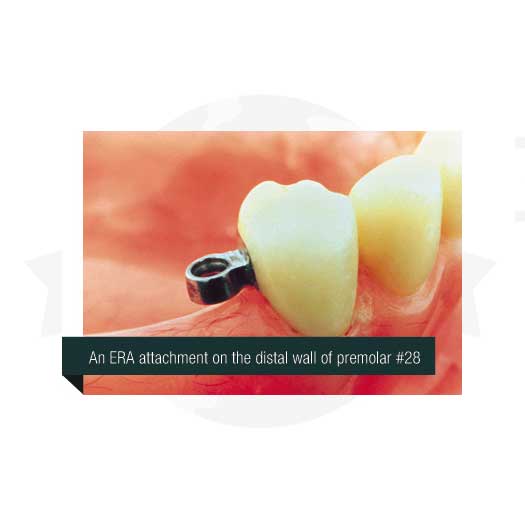
ERA attachments
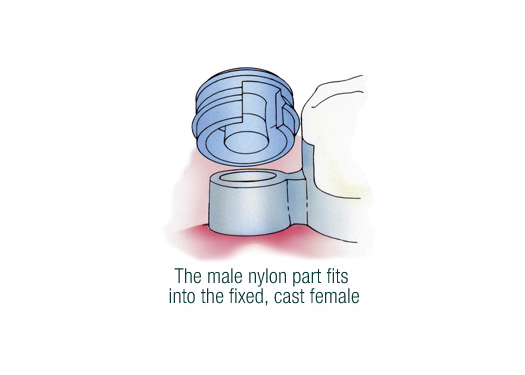
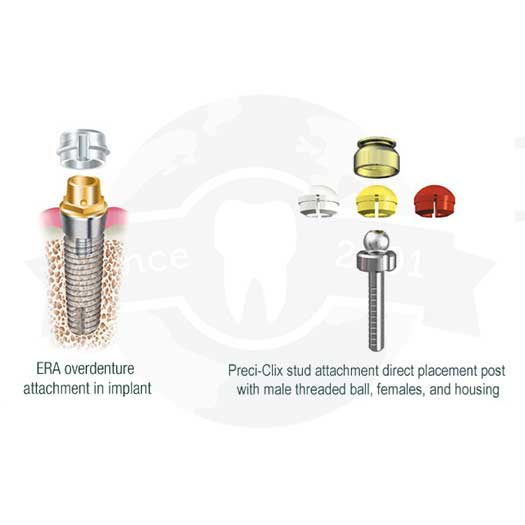
The ERA attachment by Sterngold is an extracoronal semi-precision attachment intended for combination cases utilizing fixed crown and bridge and a Kennedy Class I or Class II removable cast metal partial. Being resilient attachments, ERA attachments place the occlusal load on both the abutment teeth and the edentulous ridge. They provide vertical resiliency through the use of a nylon male that fits into the metal extracoronal female. The female is a plastic pattern, which is waxed into the pattern of the crown or bridge restoration for a single-piece casting. The male part is retained directly in processed acrylic or retained inside an ERA metal jacket that is then processed into the acrylic. The metal jacket is made of stainless steel so that it can be soldered or welded to the cast framework, if desired. Sterngold offers six color-coded males for six levels of retention. From lightest to heaviest in retention, they are white, orange, blue, grey, yellow, and red.
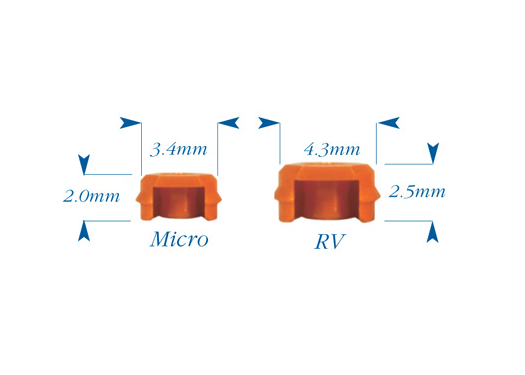
Micro ERA attachments
Two sizes of the ERA attachment are available. Due to its size, we prefer the Micro ERA, as it can be used in most instances. The Micro ERA attachment is 20% smaller than the ERA-RV, making it the smallest extracoronal resilient attachment in the world (only 2mm tall and 3.4mm wide).
Please refer below for information regarding the space requirements for both the RV (Reduced Vertical) and Micro sizes. If a metal jacket is to be used for housing the nylon male, please add 0.3mm to the required space. If a patient has a very strong bite, it is recommended that you add 1mm to the height requirement. Take notice that allowance has already been made for the acrylic, which will surround and hold the attachment component. The acrylic thickness occlusal to the male component is 1mm and the acrylic thickness lateral to the male attachment is 1mm on each side.
general guidelines
FC Width (Fixed Component of the attachment) = Minimum buccal-lingual space necessary for the female component on the mesial or distal wall of the fixed restoration.
RC Width (Removable Component of the attachment) = Minimum buccal-lingual space required in the removable partial male component.
When choosing the ERA attachment, please take into consideration the following information provided by Sterngold, the manufacturer of the ERA attachment.
The following are general guidelines that may be used to help you to decide on which attachment might be best for a particular situation. They are based on 80 years of experience with dental attachments, but the final choice must be based on the particular dentist’s philosophy, education, and experience. Based on your answers to the following question you will choose either Non-Resilient Attachments or Resilient Attachments.
- Bone Support Around the Abutments – If the bone support is good (0-20% bone loss), or if abutments can be made strong by splinting, non-resilient attachments are the connectors of choice. If the bone support is fair (20%-40% bone loss), the choice will most often be resilient attachments. If the bone loss is 40% or greater, more than likely the abutments need to be reduced to the height of the gingival tissue and the roots used to retain an overdenture.
- The Condition of The Ridge – If the edentulous ridge has little loss of bone, either resilient or non-resilient attachments could be used. But, if the ridge is significantly resorbed, non-resilient attachments would most likely be indicated.
- Is the opposing arch non-resilient (rigid) or resilient? Two resilient prostheses should generally not oppose each other, as two mobile occlusal planes will impair chewing efficiency.
ERA-RV
Minimum Space Required
Height
3.5mmFC Width
2.8mmPrep Depth
Normal CrownRC Width
6.3mm
Micro ERA
Minimum Space Required
Height
3.0mmFC Width
2.2mmPrep Depth
Normal CrownRC Width
VKS and Preci-Sagix attachments
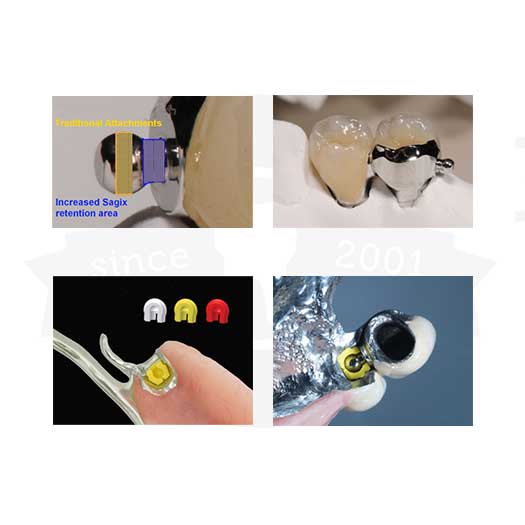
Similar in design to the VKS-SG attachment by Bredent, the Preci-Sagix is manufactured by CEKA PRECI-LINE in Belgium. The Sagix attachment is available as a prefabricated “cast-to” 1.7mm and 2.2mm sphere, which provides consistent, accurate results (we parallel and wax the precast male onto the waxed crown/bridge prior to casting of the crown/bridge). The males are 100% round and smooth, eliminating wear on nylon females. They are also available as a plastic, castable part, which can be cast using the same alloy as the crown/bridge. The 1.7mm ball requires a vertical space of 3.1mm and a diameter of 3.1mm, while the 2.2mm ball requires a vertical space of 4.1mm and a diameter of 4.2mm.
The Sagix attachment has a segmented female, which flexes over the height of contour of the sphere and engages the neck of the sphere, as well as more of the sphere itself. A standard VKS female engages only the height of contour of the sphere, so the Sagix female provides added, longer-lasting retention for better results. The Sagix females are also compatible with the VKS-SG males, so an existing VKS attachment can benefit from the use of a Sagix female. The flexing of the rigid female around the height of contour of the sphere allows the female 35% more retention area contact than other designs of ball attachment females. This provides excellent retention due to the increased surface area of contact between the female and the male attachments. We place the medium retention level yellow female within the housing after the case has been processed. The white color female is the low retention level, and the red color female is the high retention level female.
*Photos courtesy of Preat Corporation.

Image courtesy of Preat Corporation.
Information courtesy of Preat Corporation
Stress-breaker, dovetail, rod and tube attachments for unparallel bridge abutments
Use when the abutments—either prepped teeth or implant abutments—are not parallel and require an attachment for independent seating of the crown and/or bridge.


Actual case fabricated by Global Dental Solutions.
The benefits include:
- Bridge segmentation allows for reduced tooth reduction and independent seating and cementation.
- It is easier to overcome parallax by preparing groups of abutments parallel to each other than an entire arch.
- Cementation of a segment is easier and more accurate than cementation of a long span bridge. The hydraulic resistance of cement exponentially increases with multiple units.
- Bridge segmentation eliminates potentially pathologic cross arch forces. When a force is applied on the left side of a full arch bridge (in a natural dentition, the periodontal ligament allows for minor physiological movement), a potential pathologic lifting force is transferred to abutments on the right side of the arch.
- Extensive mandibular long span bridges can reduce the ability of the mandible to flex, causing trauma to the abutments. This is accentuated in mandibular implant supported bridges, as there is no implant mobility to offset abutment rigidity and allow normal flexing of the mandible.
There are two types of stress-breakers, which are explained below.
- Rod and tube attachments are taller and narrower, just like anterior teeth, and thus are used commonly to splint anterior teeth. The attachment design allows for esthetic incorporation into the contours of the crown/bridge. Less bulk is required in the anterior due to reduced forces.
- Dovetail attachments are commonly used for posterior segmentation. Like posterior teeth, these attachments are shorter and wider to both allow for esthetic incorporation as well as withstand the increased posterior masticatory forces. When maximum esthetics are required, simply invert the attachment: Place the male on the abutment and the female inside the pontic. This eliminates the showing of metal and, when used in the mandible, allows flexure.
Overdenture attachments
Overdentures offer prosthesis retention for the patient suffering from retention problems with the typical complete denture, particularly those patients with advanced ridge resorption. Overdentures obtain their support from two or more abutments by completely enveloping them beneath the fitting surface. (The use of only one abutment is not recommended.) Overdentures offer these patients greatly improved retention and stability. The overdenture attachment can be placed in tooth roots that have been saved, or torqued into dental implants that have been placed to receive them. Examples of overdenture attachments are ERA, LOCATOR, and Preci-Clix type attachments.
Fixed detatchables
For information on screw-retained overdentures, commonly referred to as fixed detachables, please refer to the Fixed Detachables page of our site.
Root cap abutments
Root cap abutments are fabricated for use with overdentures. We can use almost any overdenture attachment in conjunction with a root cap abutment. Zest Anchors (LOCATOR), Sterngold (ERA), and Bredent all have viable offerings, to name a few. Root cap abutments are a type of stud attachment. See the Stud & Bar Attachments page for more information.

The photo shown is of two custom root caps with OC attachments by Bredent. Please also refer to the Overdenture section of our website.

The photo shown is of a custom root cap with an ERA attachment by Sterngold. Please also refer to the Overdenture section of our website.
Stud Attachments
Stud precision attachments are used on roots and/or implants for retaining removable overdentures. Stud attachments need to be parallel to each other to provide ease of insertion and removal and reduce wear potential. Most brands offer a solution to correct implant parallel issues/implant divergence. Do not engage labial soft tissue undercuts with the denture base flange, as this will alter the path of insertion and cause excessive wear to the parts. Stud attachments are low in profile to reduce leverage upon the retaining abutments, are easy for patient hygiene maintenance, allow physiologic independent movement of abutments, and are easy to independently service. We have experience utilizing many different brands and types of stud attachments, including but not limited to Bredent (VKS), Sterngold (ERA), Zest Anchors (LOCATOR), and CEKA/PRECI-LINE.
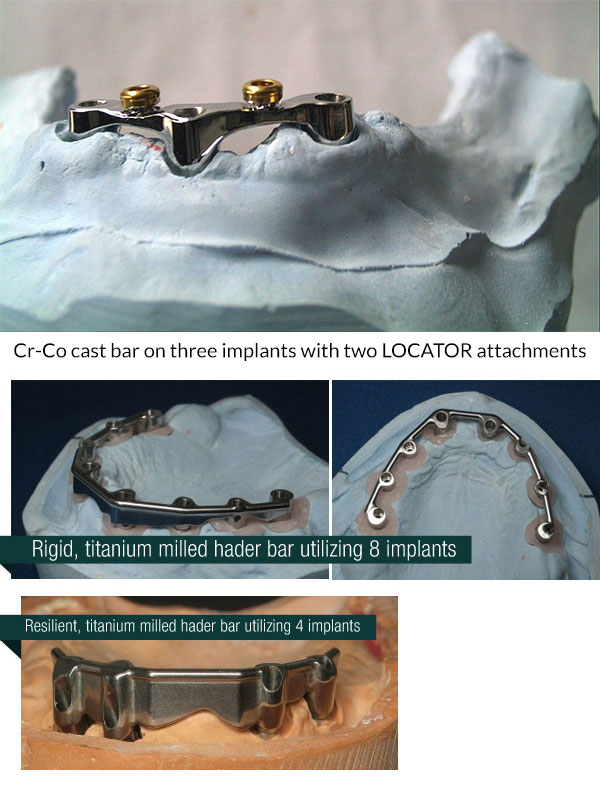
Implant Bars
Implant bars splint the attachments together and can provide increased stability for the denture. They can be cast or milled, with cast bars being less costly than milled bars. When being cast, the bars require the use of UCLA abutments. We can cast bars using Cr-Co alloy or various other alloys, as requested by the doctor. Milled bars are made of titanium. Regarding the attachments placed onto the bar, there are many options available. Some of the most popular are the LOCATOR attachment, Sterngold’s ERA attachment, or ball-and-socket attachments made by various brands. Overdenture bars can be either resilient (tissue supported) or rigid (abutment supported), depending upon the design of the bar. Bars that are extended from the anterior to posterior are rigid, while those on the anterior region are resilient. Rigid bars direct forces to the abutments, while resilient bars direct forces to the tissue and bone. You do not engage labial soft tissue undercuts with the denture base flange, as this will alter the path of insertion and cause excessive wear to the overdenture parts.
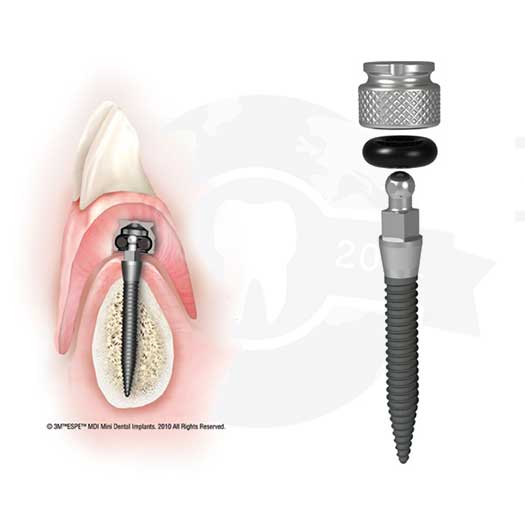
Mini dental implant
Introduced in 1999 as the IMTEC Sendax MDI™ System, the MDI Mini Dental Implant System by 3M ESPE has become a very popular small-diameter implant system. Mini dental implants are clinically proven and indicated for long-term denture stabilization, and can be surgically placed with an easy-to-learn, 90-minute flapless procedure.
MDI features
- Implants are placed through a small pilot hole, not into a full osteotomy
- Implant designs for stability in soft and dense bone
- Attachment designs, which forgive up to 30 degree divergence between two implants
- Original retention can be restored simply by replacing the O-ring
We can fabricate dentures utilizing the housings and O-rings for the MDI System by 3M ESPE, or any other brand of mini dental implant.
LOCATOR
Indications
The LOCATOR Implant Attachment System is designed for use with overdentures or partial dentures, retained in whole or in part by endosseous implants in the mandibular or maxilla. Take notice that LOCATOR attachments can also go into an endodontically treated tooth or on a bar.
LOCATOR R-Tx Product Information
The LOCATOR R-Tx attachment system is the latest innovation in dental abutments, designed to provide superior performance and aesthetics for attachment retained overdenture. Featuring the advanced DuraTec™ Titanium Carbon Nitride coating, this system offers enhanced durability and wear resistance, ensuring long-lasting results. Key features include:
- Dual Retentive Surfaces: Provides greater stability and retention for dentures.
- Increased Pivoting Capability: Allows up to a 60° pivot between implants, enhancing flexibility and ease of use.
- Narrower Coronal Geometry: Facilitates easier denture seating and improved patient comfort.
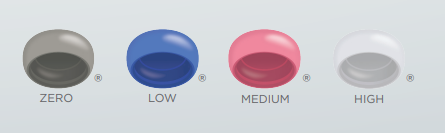
- New Retention Insert Design: Improved design resists edge deformation. The system utilizes of Retention inserts with straightforward retention values – Zero, Low, Medium, High
- Compatibility with All Implant Systems: Ensures versatility and ease of integration with existing dental implants.
With these features, the LOCATOR R-Tx system improves functionality and enhances the overall aesthetic appearance of dentures. The system’s innovative design helps dental professionals deliver better patient outcomes.
Legacy LOCATOR Product Information
- Lowest vertical height: The total height of the lowest LOCATOR Attachment (abutment plus male) is only 3.17mm on an externally hexed implant, and 2.73mm on a non-hexed implant.
- Locating design: Self-locating design allows patients to easily seat their overdentures without the need for accurate alignment of the attachment components.
- Retention inside and outside: The unique Dual Retention innovation provides the LOCATOR attachment with greater retention surface area than ever before available with other attachments. A combination of inside and outside retention ensures the longest lasting performance.
- Use with nonparallel implants: Angle correction nylon inserts allow easy correction of divergent implants.
- Rotational pivoting action: The design of the pivoting LOCATOR male allows a resilient connection for the prosthesis without any resulting loss of retention. The retentive nylon male remains completely in contact with the female socket while its metal denture cap as a full range of rotation movement over the male.
Contradictions
Not appropriate where a totally rigid connection is required.


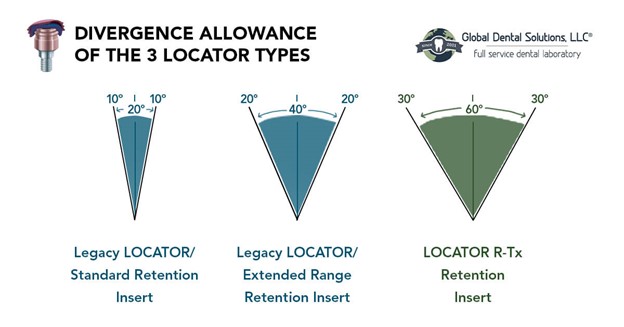
Divergence Allowance of the 3 LOCATOR Types
One of the standout features of the LOCATOR R-Tx attachment system is its impressive divergence capability. Compared to other LOCATOR systems, it offers a significant 50% increase in pivoting capacity, allowing it to accommodate up to 60° of convergence/divergence between implants without needing pre-angled abutments. This flexibility simplifies the treatment process and makes it easier to achieve optimal results. Here’s how the divergence capability compares among the three LOCATOR types:
- LOCATOR Legacy System: Handles up to 20° of divergence. When used in conjunction with extended range males, the Legacy system handles up to 40
- LOCATOR R-Tx System: Handles up to 60° of divergence, offering a 50% increase in pivoting capacity.
- LOCATOR R-Tx Pivoting Technology: Ensures smoother and more secure denture seating, reducing patient discomfort and improving overall satisfaction.
This enhanced pivoting technology allows dental professionals to provide patients with more comfortable and stable dentures, even in cases with significant implant divergence.
Placement of the LOCATOR implant abutment

- To select the proper LOCATOR implant abutment, determine the type of implant and the diameter being used, then measure the tissue thickness from the apical rim of the implant body to the crest of the gingiva. The implant female MUST be at least 1.5mm above the highest tissue point for full seating of the male. This 1.5mm is built in to all cuffs, i.e., a 2mm cuff height is 3.5mm (2 + 1.5). Therefore, your measurement will be from the top of the implant platform to the crest (or highest) point of the tissue. Order this cuff height. Choose the closest corresponding abutment tissue cuff height available.
- After the secondary gingival healing period is complete, remove the healing cuff according to instructions provided by the manufacturer of the implant system being used.
- It is imperative that all bone and soft tissue be removed from the superior aspect of the implant body to guarantee complete seating of the LOCATOR implant abutment.
- A special LOCATOR abutment driver is designed to engage the inside diameter of the LOCATOR abutment and thread it into the implant). You may use either the gold abutment driver #8390 from the LOCATOR core tool with a .050 hex (Fig. 1) or the direct square or latch drive abutment driver (Fig. 2). The new #8394 LOCATOR abutment retaining sleeve goes over the end of the gold abutment driver and holds the abutment in place when taking the abutment to the mouth. NOTE: A torque wrench with a .050 (1.25mm) hex insert will fit into the back side of the abutment driver. The torque wrench is used to achieve the maximum seating force 30N-cm that will help prevent screw loosening. Loctite 4061 material by Henkel Adhesives works well to prevent gradual unthreading.
- When placing multiple attachments, snap a parallel post into each seated LOCATOR abutment to make sure the parallelism between implants is within 10º of each other. NOTE: if the divergence is greater than 10º, use the #8547 green male, #8915 orange, or #8548 red male insert to correct divergence.
Preparing to send a LOCATOR case
When preparing to send us a case that requires our lab to place the LOCATOR male, please proceed with the following steps.
Option A:
Using the impression copings
- Insertion of the proper LOCATOR implant abutment at tissue level has been completed.
- Place a LOCATOR impression coping with black processing male onto each LOCATOR abutment (Fig. 1). These require 4.5mm of height. A low-profile alternative is using the metal housings.
- Take an impression using a firm body impression material, exercising caution not to compress the soft tissue. The LOCATOR impression coping is designed with minimum retention to be picked up with the impression material.
- Snap a LOCATOR abutment analogue onto each impression coping in the impression. The analogue must not fall off when turned upside down with vibration (Fig.2). *Our laboratory will complete this step.

Option B:
Using the metal housings instead of impression copings
- Insert a LOCATOR cap with black processing male into each cemented female or, if you choose, the #8505 impression analogue (Fig. 3). The built-in spacer of the black processing male will maintain the overdenture in its upper limit of vertical resiliency during the processing procedure.
- Take an impression using a firm body impression material, exercising caution not to compress the soft tissue (Fig. 4). When the impression is withdrawn, the processing cap males will remain in the cemented females.
- Remove the processing cap male from each female and snap it into a LOCATOR female analog (Fig. 5) #8516. Reposition this assembly back into the impression, making sure it is fully seated (Fig. 6). *Our laboratory will complete this step.
